Vinyl Insulated Siding A Comprehensive Guide
Vinyl insulated siding offers a compelling blend of aesthetics, energy efficiency, and practicality for homeowners and builders alike. Its popularity stems from a combination of factors: relatively low cost, ease of installation, minimal maintenance requirements, and a wide array of styles and colors to suit diverse architectural preferences. This guide delves into the multifaceted world of vinyl insulated siding, exploring its manufacturing, installation, maintenance, cost-effectiveness, environmental impact, and design possibilities.
From understanding the manufacturing process and the role of insulation in enhancing energy efficiency to mastering installation techniques and addressing common maintenance concerns, we aim to provide a thorough and accessible resource for anyone considering vinyl insulated siding for their next project. We’ll also compare it to alternative cladding materials, examining long-term costs and environmental implications to help you make an informed decision.
Vinyl Siding Manufacturing Process
The production of vinyl insulated siding is a multi-stage process involving the careful blending of raw materials, precise extrusion, and quality control measures to ensure a durable and aesthetically pleasing final product. This process transforms basic polymers into a weather-resistant, low-maintenance cladding solution for homes and buildings.
Raw Material Selection and Preparation
The manufacturing process begins with the selection and preparation of raw materials. These primarily include polyvinyl chloride (PVC) resin, which is the base material for vinyl siding, and various additives that enhance its properties. These additives can include stabilizers (to prevent degradation from UV light and heat), lubricants (to aid in the extrusion process), pigments (to achieve the desired color), and impact modifiers (to improve the siding’s resistance to damage).
The raw materials are carefully weighed and blended in a precise ratio to achieve the desired properties for the final product. This ensures consistency in color, durability, and performance across different batches of siding.
Extrusion and Shaping
The blended PVC mixture is then fed into an extrusion machine. This machine melts the mixture and forces it through a die, shaping it into the desired profile of the siding. The die is precisely engineered to create the various grooves, textures, and thicknesses that characterize different vinyl siding styles. The extruded vinyl is then cooled and cut to the specified lengths.
This process requires careful control of temperature and pressure to ensure consistent quality and prevent defects.
Insulation Integration
Insulated vinyl siding incorporates a layer of insulation within the panel. This is typically done by bonding a rigid foam core, such as expanded polystyrene (EPS) or extruded polystyrene (XPS), to the back of the vinyl facing during the extrusion process or by applying it as a separate layer before finishing. The type and thickness of the insulation will determine the R-value of the siding, which is a measure of its thermal resistance.
Higher R-values indicate better insulation properties. The addition of insulation significantly enhances the energy efficiency of the building by reducing heat transfer.
Types of Vinyl Used and Their Properties
Several types of PVC resins are used in vinyl siding manufacturing, each with specific properties. The choice of resin depends on the desired performance characteristics, such as impact resistance, flexibility, and color stability. For instance, some resins may offer superior resistance to impact damage, while others might be better suited for applications in extreme climates. The specific formulation of the resin blend is a closely guarded proprietary secret for many manufacturers, often optimized for specific market conditions.
Insulation Types and Their Properties
The choice of insulation significantly impacts the overall performance and cost of insulated vinyl siding.
| Insulation Type | R-Value (per inch) | Cost (relative) | Durability |
|---|---|---|---|
| Expanded Polystyrene (EPS) | 3.5 – 4.0 | Low | Moderate |
| Extruded Polystyrene (XPS) | 5.0 – 7.0 | Medium | High |
| Polyisocyanurate (Polyiso) | 6.0 – 8.0 | High | High |
Note: R-values can vary depending on the thickness of the insulation and the specific manufacturer’s formulation. Cost and durability are relative comparisons and can fluctuate based on market conditions and specific product lines.
Finishing and Quality Control
After the extrusion and insulation integration, the vinyl siding undergoes a finishing process. This may include trimming, painting, or applying a protective coating. Rigorous quality control checks are performed throughout the manufacturing process to ensure that the siding meets the required specifications for dimensions, color consistency, and performance. Defective panels are rejected, and only high-quality products are shipped to customers.
These quality control measures are critical to ensuring the long-term performance and durability of the siding.
Installation Methods and Techniques
Proper installation of vinyl insulated siding is crucial for ensuring its longevity, aesthetic appeal, and effectiveness as a weather barrier. This section details the necessary steps, tools, and techniques for a successful installation, highlighting common pitfalls and offering solutions for various building types.
Tools and Materials Required
A successful vinyl siding installation requires a comprehensive collection of tools and materials. These ensure efficiency and a professional finish. The list below is not exhaustive, but it covers the essentials.
- Measuring tape and level: Accurate measurements are paramount for precise cuts and straight lines.
- Chalk line: Used to mark straight lines for consistent siding placement.
- Circular saw or miter saw: For accurate cutting of siding panels to size.
- Jigsaw: Useful for cutting around complex shapes and obstacles.
- Hammer and nail gun (optional but recommended): For securing the siding to the sheathing.
- Utility knife: For trimming and cutting smaller pieces of siding.
- Safety glasses and gloves: Essential for personal safety during the installation process.
- Vinyl siding: The main component, chosen according to the desired style and color.
- J-channel, starter strip, and other trim pieces: These provide a clean and professional finish at the edges and corners.
- Fasteners: Galvanized nails or screws appropriate for the siding material and building structure.
- Caulk: Used to seal gaps and ensure weather tightness.
Step-by-Step Installation Guide
The installation process generally follows these steps, though specifics may vary depending on the building’s design and the siding’s profile.
- Preparation: Begin by thoroughly inspecting the wall sheathing for any damage or irregularities. Repair any issues before starting the siding installation. Ensure the sheathing is clean and dry.
- Installation of Starter Strip: Install the starter strip along the bottom edge of the wall, providing a level base for the first row of siding. Ensure it’s level and straight using a level.
- First Row of Siding: Install the first row of siding panels, overlapping them according to the manufacturer’s instructions (typically a 1/2″ to 1″ overlap). Secure them with nails or screws, avoiding overdriving.
- Subsequent Rows: Continue installing subsequent rows, ensuring proper overlap and alignment with the previous rows. Use a level to maintain vertical alignment.
- Corner and J-Channel Installation: Install J-channel around corners and window/door frames to create a neat and weather-resistant finish.
- Finishing: Once all siding panels are installed, install any necessary trim pieces to complete the installation. Caulk all gaps and seams to prevent water infiltration.
Proper Siding Overlap and Fastening Techniques
A visual representation of proper siding overlap and fastening would show two overlapping siding panels. The top panel overlaps the bottom panel by approximately 1/2″ to 1″. Fasteners should be placed near the top edge of each panel, approximately 1/2″ from the top edge and spaced evenly along the panel. The nails or screws should be driven straight in, avoiding overdriving which could cause damage to the siding.
The fasteners should penetrate the siding and firmly secure it to the underlying sheathing. Avoid driving fasteners into the bottom edge of the panel to avoid causing warping or buckling.
Common Installation Mistakes and How to Avoid Them
Several common mistakes can compromise the installation’s quality and longevity. These include improper overlapping, overdriving fasteners, failing to properly caulk gaps, and neglecting to account for expansion and contraction of the vinyl. Careful planning, attention to detail, and adherence to manufacturer’s instructions minimize these risks.
Installation Techniques for Various Building Types
While the basic principles remain consistent, installation techniques may adapt slightly depending on the building type. For instance, installing siding on a multi-story house requires more careful planning for scaffolding and material handling. Commercial buildings may necessitate specialized techniques for larger panels or more intricate designs. Always consult with experienced professionals for complex installations.
Maintenance and Repair of Vinyl Insulated Siding
Proper maintenance ensures your vinyl insulated siding remains attractive and functional for years to come. Regular cleaning and prompt attention to minor damage will prevent larger, more costly repairs down the line. This section details the necessary steps for maintaining and repairing your vinyl siding.
Cleaning Vinyl Insulated Siding
Regular cleaning removes dirt, grime, and other debris that can dull the appearance and potentially damage the siding over time. A simple solution of mild detergent and water, applied with a soft-bristled brush or sponge, is usually sufficient. Rinse thoroughly with a garden hose to remove all traces of soap. For stubborn stains, a pressure washer can be used, but it’s crucial to maintain a safe distance to avoid damaging the siding.
Always test any cleaning solution in an inconspicuous area first to ensure it doesn’t discolor the vinyl. Avoid abrasive cleaners or harsh chemicals, as these can scratch or damage the surface. Annual cleaning is recommended, with more frequent cleaning in areas exposed to heavy pollution or environmental factors.
Repairing Scratches and Dents
Minor scratches and dents are common occurrences, especially in areas prone to impact. Small scratches often self-heal over time due to the flexibility of the vinyl. For more noticeable scratches, a vinyl repair kit containing colored caulk or putty can be used to match the siding’s color and fill the imperfection. For dents, carefully apply heat from a hairdryer to the affected area.
The heat will soften the vinyl, allowing you to gently push the dent back into shape. It’s important to work slowly and avoid applying excessive heat. For larger or more severe dents that cannot be easily repaired, replacement of the affected siding panel might be necessary.
Addressing Weather-Related Damage
Exposure to extreme weather conditions can cause various types of damage to vinyl siding. Cracking or warping can result from prolonged exposure to intense heat or cold. Loose or damaged panels are often a consequence of strong winds or hail. Regular inspection of your siding is crucial to identify these problems early. Damaged or loose panels should be replaced as soon as possible to prevent further damage and maintain the integrity of the siding system.
Caulking around windows and doors should be checked regularly and reapplied as needed to prevent water intrusion.
Common Problems and Solutions
Regular inspection and prompt attention to minor issues are vital for maintaining the longevity and aesthetic appeal of your vinyl insulated siding. Below is a list of common problems and their corresponding solutions:
- Problem: Dirt and grime buildup. Solution: Wash with mild detergent and water.
- Problem: Minor scratches. Solution: May self-heal; otherwise, use vinyl repair putty.
- Problem: Dents. Solution: Apply heat carefully and reshape; replace if severe.
- Problem: Cracked or warped panels. Solution: Replace damaged panels.
- Problem: Loose panels. Solution: Re-secure or replace panels.
- Problem: Water damage around windows/doors. Solution: Re-caulk.
- Problem: Fading. Solution: Regular cleaning can help mitigate fading; replacement may be necessary for severe cases.
Cost Analysis and Comparison with Alternatives
Choosing the right exterior cladding for your home involves careful consideration of various factors, including aesthetics, durability, and, importantly, cost. Vinyl insulated siding offers a balance of these elements, but its overall price and long-term value must be weighed against other options. This section will analyze the cost of vinyl insulated siding, comparing it to alternatives and providing a framework for calculating the total project expense.
Factors Influencing the Cost of Vinyl Insulated Siding
Several factors significantly impact the final cost of vinyl insulated siding. The price per square foot varies depending on the quality of the vinyl, the thickness of the insulation, the style and color chosen, and the complexity of the installation. Higher-end vinyl siding with thicker insulation and more intricate designs will naturally be more expensive. The size and complexity of your home’s exterior also play a crucial role; a larger house with numerous angles and architectural details will require more material and labor, leading to higher costs.
Regional variations in labor rates and material availability can also affect the overall price. Finally, the need for additional services, such as removal of existing siding or repair of underlying sheathing, will add to the total expense.
Price Comparison with Other Exterior Cladding Materials
Vinyl insulated siding typically falls within a mid-range price bracket compared to other exterior cladding materials. Wood siding, while aesthetically pleasing, commands a higher price due to its higher initial cost, the need for regular maintenance (painting, staining, repairs), and its shorter lifespan compared to vinyl. Aluminum siding is generally less expensive than vinyl insulated siding upfront, but it can be susceptible to dents and scratches, potentially leading to higher long-term maintenance costs.
Fiber cement siding offers excellent durability and longevity, but its initial cost is significantly higher than vinyl, often exceeding it by a considerable margin. The price per square foot can vary widely depending on the specific product and the supplier, but a general comparison would show wood being the most expensive, followed by fiber cement, vinyl insulated siding, and then aluminum siding as the least expensive initially.
Calculating the Total Cost of a Siding Project
Calculating the total cost of a siding project requires a careful breakdown of materials and labor. First, measure the total square footage of your home’s exterior walls that need siding. Next, obtain quotes from multiple siding suppliers for the chosen vinyl insulated siding, including the cost of any necessary trim pieces and accessories. These quotes should specify the price per square foot.
Separately, obtain quotes from reputable contractors for labor costs. These quotes should detail the hourly or per-square-foot labor rate, and should account for tasks like removal of existing siding (if needed), installation of new siding, and any necessary repairs to the underlying sheathing. The total cost will be the sum of material costs and labor costs, plus any additional costs such as permits and waste disposal.
For example, if the material cost is $5 per square foot for 1000 square feet, and labor costs are $3 per square foot, the total cost for materials would be $5000, and the total labor cost would be $3000, resulting in a total cost of $8000. This is a simplified example, and actual costs may vary significantly.
Long-Term Cost-Effectiveness Comparison
The following table compares the long-term cost-effectiveness of different siding options, considering factors such as initial cost, maintenance, and lifespan. Note that these figures are estimates and can vary based on location, material quality, and labor costs.
| Siding Material | Initial Cost (Estimate per sq ft) | Maintenance Cost (Estimate per year) | Lifespan (Years) |
|---|---|---|---|
| Wood | $8 – $15 | $2 – $5 | 20-30 |
| Aluminum | $4 – $8 | $1 – $3 | 30-50 |
| Vinyl Insulated | $6 – $12 | $0.5 – $1 | 30-50 |
| Fiber Cement | $10 – $20 | $0.5 – $2 | 50-80 |
Environmental Impact and Sustainability

Vinyl insulated siding, while offering numerous benefits in terms of durability and energy efficiency, presents environmental considerations throughout its lifecycle, from manufacturing to disposal. Understanding these impacts is crucial for making informed decisions about its use and promoting more sustainable practices within the building industry. This section will explore the environmental footprint of vinyl siding, comparing it to alternatives and highlighting opportunities for improvement.
Manufacturing and Disposal of Vinyl Insulated Siding
The production of vinyl siding involves the extraction and processing of raw materials, primarily polyvinyl chloride (PVC), a petroleum-based plastic. This process is energy-intensive and contributes to greenhouse gas emissions. Furthermore, the manufacturing process can release volatile organic compounds (VOCs) into the atmosphere, impacting air quality. At the end of its lifespan, vinyl siding often ends up in landfills, where it persists for hundreds of years without decomposing, contributing to environmental pollution.
The incineration of vinyl siding, while reducing landfill burden, can release harmful dioxins and furans into the atmosphere.
Carbon Footprint Comparison with Other Siding Materials
The carbon footprint of vinyl siding varies depending on manufacturing processes and transportation distances. However, studies generally indicate that it has a higher carbon footprint compared to some alternative materials, such as fiber cement or wood siding sourced from sustainably managed forests. For instance, a life cycle assessment comparing vinyl siding to wood siding might reveal that wood, depending on its source and treatment, could have a lower embodied carbon, particularly if sourced from sustainably managed forests and utilizing low-impact treatment processes.
Fiber cement, while requiring energy-intensive manufacturing, often demonstrates a lower overall carbon footprint due to its longer lifespan and lower replacement rate. The specific comparison is highly dependent on the sourcing, transportation, and manufacturing processes involved for each material.
Sustainable Practices in Vinyl Siding Production and Use
Several strategies can mitigate the environmental impact of vinyl siding. Manufacturers are increasingly adopting more energy-efficient production methods and exploring the use of recycled PVC content in their products. Using recycled content reduces the demand for virgin PVC, thus lessening the environmental impact associated with extraction and processing. Furthermore, selecting vinyl siding with high levels of recycled content directly supports sustainable manufacturing practices.
Consumers can contribute by choosing products with certifications that demonstrate adherence to environmental standards and by opting for longer-lasting, high-quality siding to reduce the frequency of replacements.
Recycling Options and Waste Reduction
Currently, the recycling infrastructure for vinyl siding is limited compared to other materials. However, some companies are actively involved in developing and implementing vinyl siding recycling programs. These programs often involve collecting and processing discarded siding to create new products, thereby diverting waste from landfills and reducing the demand for virgin PVC. Increased investment in recycling infrastructure and the development of innovative recycling technologies are crucial for expanding the recycling options for vinyl siding and significantly reducing waste in the industry.
Additionally, initiatives promoting the reuse of existing vinyl siding in renovation projects could further contribute to waste reduction.
Aesthetic Considerations and Design Options
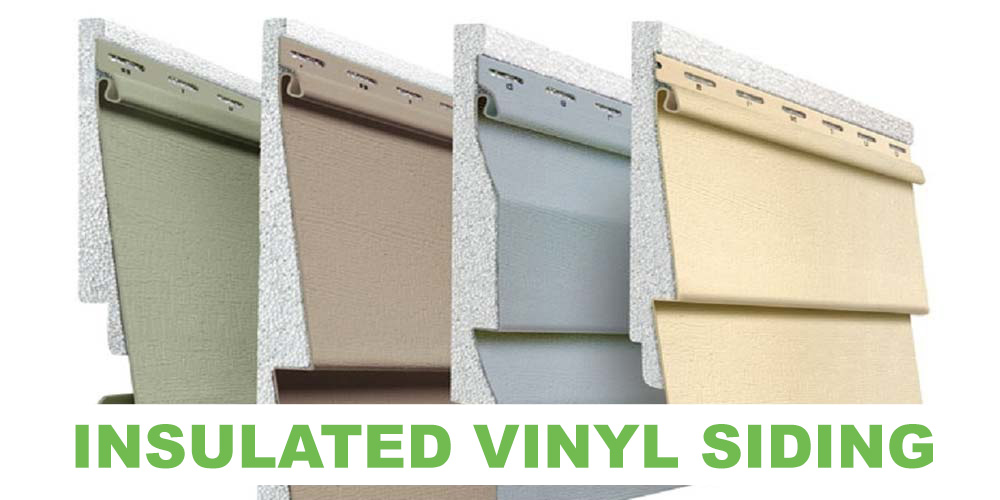
Vinyl insulated siding offers a remarkable range of aesthetic possibilities, allowing homeowners to personalize their homes’ exteriors and enhance curb appeal. The versatility of this material extends beyond its functional benefits, providing a wide array of color, style, and texture options to complement diverse architectural styles and personal preferences.
Color and Style Variety in Vinyl Insulated Siding
Vinyl siding manufacturers offer an extensive palette of colors, from classic whites and creams to bold blues, greens, and reds. Many manufacturers also offer wood-grain finishes, stone textures, and even stucco-like appearances, allowing for a level of customization previously unattainable with traditional materials. These options enable homeowners to create a unique look that aligns with their home’s architectural style and their personal tastes.
For example, a Cape Cod style home might be beautifully complemented by a creamy white vinyl siding with subtle wood-grain texture, while a modern farmhouse could benefit from a sleek, deep gray siding with clean lines. The availability of various profiles, such as clapboard, shingle, and vertical panel, further expands the design possibilities.
Vinyl Siding and Architectural Styles
The adaptability of vinyl insulated siding makes it suitable for a wide variety of architectural styles. A traditional Victorian home can be elegantly accented with vinyl siding mimicking the intricate detailing of wood shingles, while a contemporary home can benefit from the clean, minimalist lines of a smooth, solid-color vinyl panel. Ranch-style homes often look well-maintained and updated with horizontal lap siding in earth tones.
The versatility extends to the integration of other exterior elements. For instance, vinyl siding can seamlessly complement brick accents, stone facades, and various window and door styles, creating a harmonious and visually appealing exterior.
Enhancing Curb Appeal and Property Value
Well-maintained and aesthetically pleasing vinyl siding significantly contributes to a home’s curb appeal and, consequently, its market value. A fresh coat of siding can instantly rejuvenate a home’s appearance, making it more attractive to potential buyers and increasing its overall value. Studies have shown that upgrading exterior features, including siding, can yield a substantial return on investment. For example, replacing outdated or damaged siding with attractive, modern vinyl siding can increase a home’s value by a significant percentage, depending on location and the extent of the renovation.
The durability and low maintenance requirements of vinyl siding also contribute to its long-term value.
Hypothetical House Exterior Design
Consider a two-story colonial-style home. The exterior design could feature a combination of vinyl siding profiles and colors to create visual interest and depth. The main body of the house could be clad in a warm, medium-toned gray vinyl siding with a subtle wood-grain texture, evoking a sense of classic elegance. The trim around the windows and doors could be accented with a crisp white vinyl siding, creating a sharp contrast and highlighting the architectural details.
The gable ends could incorporate a darker gray vinyl shingle siding, adding a touch of visual complexity and texture. The overall aesthetic would be sophisticated, timeless, and inviting, effectively showcasing the versatility and aesthetic potential of vinyl insulated siding. This combination creates a balanced and visually appealing exterior that enhances the home’s curb appeal and market value.
Ending Remarks

Vinyl insulated siding presents a viable and attractive option for homeowners and builders seeking a durable, energy-efficient, and aesthetically pleasing exterior cladding solution. By carefully considering the factors Artikeld in this guide—from initial cost and installation to long-term maintenance and environmental impact—you can confidently assess whether vinyl insulated siding aligns with your project’s specific needs and priorities. Remember to consult with qualified professionals for installation and to address any specific concerns regarding your building type or climate.
Quick FAQs
What is the lifespan of vinyl insulated siding?
With proper maintenance, vinyl insulated siding can last for 20-50 years or more.
Can vinyl insulated siding be painted?
Generally, painting vinyl siding isn’t recommended as it can void warranties and may damage the siding’s finish. The wide variety of colors available usually eliminates the need for painting.
Is vinyl insulated siding fire resistant?
Vinyl siding is considered fire-retardant but not fireproof. It meets building codes but will still melt and burn if exposed to intense flames for a prolonged period.
How do I clean vinyl insulated siding?
Regular cleaning with a mild detergent solution and water using a soft brush or sponge is usually sufficient. Avoid harsh chemicals or abrasive cleaners.
Does vinyl insulated siding increase home value?
While it can improve curb appeal, the impact on home value depends on various factors, including location, overall condition of the property, and the specific siding chosen. It’s generally considered a worthwhile investment for its energy efficiency and low maintenance.