How to Install Insulated Siding A Comprehensive Guide
Transforming your home’s exterior with insulated siding offers a blend of aesthetic appeal and energy efficiency. This comprehensive guide walks you through the entire process, from initial planning and material selection to the final finishing touches and long-term maintenance. Whether you’re a seasoned DIY enthusiast or a first-time installer, we’ll equip you with the knowledge and step-by-step instructions to achieve a professional-looking result.
We’ll cover everything from choosing the right tools and materials to mastering techniques for corners, windows, and other challenging areas.
Understanding the nuances of insulated siding installation is key to maximizing its benefits. This guide not only provides practical instructions but also emphasizes safety precautions and preventative maintenance strategies to ensure the longevity and effectiveness of your new siding. By the end, you’ll be confident in your ability to tackle this project and enjoy the rewards of a beautifully enhanced and energy-efficient home.
Planning & Preparation
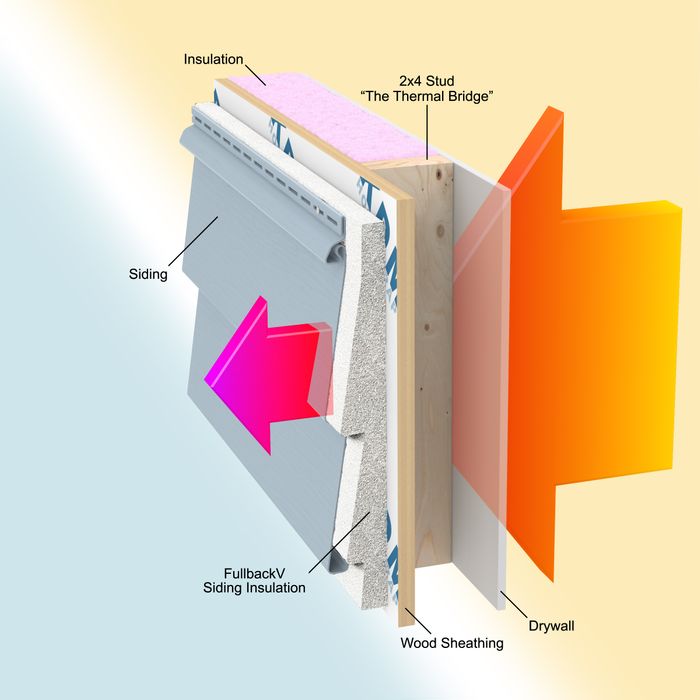
Successful insulated siding installation begins with meticulous planning and preparation. This phase ensures a smooth process, minimizes waste, and ultimately leads to a beautiful and energy-efficient exterior. Proper preparation will save you time and money in the long run.
Necessary Tools and Materials
Gathering the right tools and materials beforehand is crucial for efficient installation. A comprehensive list ensures you have everything you need readily available, preventing delays and potential frustration. Failing to have the proper tools can significantly impede progress and increase the overall project time.
| Tool | Material | Quantity | Purpose |
|---|---|---|---|
| Measuring Tape | Insulated Siding Panels | Based on calculations (see below) | Accurate measurements for material estimation and panel cutting. |
| Circular Saw with Fine-Tooth Blade | Siding Nails | Approximately 6 nails per panel | Precise cutting of siding panels to size. |
| Hammer | Caulk | 1-2 tubes | Securing siding panels and sealing gaps. |
| Level | J-Channel | Based on perimeter measurements | Ensuring straight and plumb installation of siding. |
| Utility Knife | Starter Strip | Based on perimeter measurements | Cutting and trimming various materials. |
| Safety Glasses | Flashing | As needed for windows and doors | Protecting eyes from debris during cutting and nailing. |
| Work Gloves | Underlayment (e.g., house wrap) | Sufficient to cover the entire wall area | Protecting hands from sharp edges and splinters. |
| Ladder | Trim pieces (matching siding color) | As needed for corners and edges | Safe access to higher areas. |
Measuring and Calculating Siding Needs
Accurate measurement is paramount to avoid material shortages or excessive waste. Begin by measuring the total area of the walls to be sided, accounting for windows, doors, and other openings. Remember to add extra material for cuts and potential errors. For example, a wall measuring 10 feet wide by 8 feet high has an area of 80 square feet.
However, you’ll need to add extra to account for waste. A general rule of thumb is to add 10-15% to your initial calculation to ensure you have enough material.
To calculate the needed siding: Total wall area + (10-15% for waste) = Total siding needed.
Preparing the Existing Wall Surface
Before installing the siding, the existing wall surface must be properly prepared. This involves cleaning, repairing any damage, and ensuring a smooth, even surface for the new siding. A poorly prepared surface can lead to uneven siding installation and potential long-term problems. This step is critical for achieving a professional-looking and long-lasting result.
Installation Methods
Insulated siding installation offers several methods, each with its own advantages and disadvantages depending on factors like building design, climate, and personal preference. The most common methods involve either horizontal or vertical installation, and the choice often impacts the overall aesthetic and ease of installation. Understanding the nuances of each method is crucial for a successful project.The choice between horizontal and vertical installation largely depends on personal preference and the overall design of the house.
Horizontal installation, mimicking traditional clapboard siding, is generally considered easier for beginners due to the straightforward nature of the installation process. Vertical installation, on the other hand, can create a more modern and sleek appearance, but it might require more attention to detail and potentially more intricate cuts. Both methods utilize similar fastening techniques and require careful planning and preparation of the underlying wall structure.
Starter Strip and J-Channel Installation
Proper installation of starter strips and J-channels is critical for ensuring a neat and professional finish. These components provide a consistent starting point for the siding panels and protect the edges from the elements. They also help maintain a straight and even alignment throughout the entire installation.
- Measuring and Cutting: Accurately measure the length of each wall section requiring a starter strip or J-channel. Cut the materials to the precise length using appropriate tools, ensuring clean, straight cuts. A miter saw is recommended for accurate angles.
- Positioning and Securing: Position the starter strip along the bottom edge of the wall, ensuring it is level and plumb. Secure it using appropriate fasteners, spaced evenly along its length, according to the manufacturer’s recommendations. For J-channels, position them at the corners and around windows and doors, ensuring a tight fit and proper alignment.
- Fastening Considerations: Use corrosion-resistant fasteners appropriate for the siding material and the underlying wall construction. Over-tightening can damage the siding, while under-tightening can lead to loose panels and potential damage from wind or weather. Follow the manufacturer’s instructions for fastener spacing and type.
Fastening Siding Panels to the Wall
Securing the insulated siding panels correctly is essential for ensuring the longevity and performance of the installation. Proper fastening prevents damage from wind, rain, and other weather conditions, and contributes to the overall aesthetic appeal.
- Pre-drilling: Pre-drilling pilot holes is generally recommended, especially for harder siding materials. This prevents splitting or cracking during installation.
- Fastener Selection: Choose fasteners specifically designed for the type of siding being installed. Stainless steel or other corrosion-resistant fasteners are highly recommended to prevent rust and deterioration.
- Spacing and Placement: Maintain consistent spacing between fasteners, following the manufacturer’s guidelines. Fasteners should be placed in the designated areas of the siding panel to avoid damaging the insulation core or compromising the structural integrity.
- Overlapping Panels: Ensure proper overlap between adjacent panels, following the manufacturer’s instructions. Consistent and accurate overlap is essential for a weathertight and visually appealing installation.
- Avoiding Over-Tightening: Avoid over-tightening the fasteners, as this can damage the siding panels and cause them to buckle or warp. Apply firm, even pressure to ensure a secure but not overly tight connection.
Handling Corners and Tricky Areas
Installing insulated siding around corners, windows, doors, and other obstacles requires careful planning and execution to maintain a professional and weather-tight finish. This section details techniques for handling these challenging areas, ensuring a seamless and aesthetically pleasing final product. Proper handling of these areas is crucial for both the longevity and the visual appeal of your siding installation.
Installing Siding Around Windows and Doors
When installing siding around windows and doors, precise measurements and cuts are essential. Begin by measuring the distance from the window or door frame to the edge of the siding, ensuring a consistent reveal. It’s often beneficial to use a starter strip to create a straight and level base for the first course of siding. Next, carefully measure and cut the siding panels to fit snugly around the window or door frame.
Use a sharp utility knife or siding shears for clean, precise cuts. For added security against water penetration, apply a high-quality sealant around the edges where the siding meets the frame. Remember to always follow the manufacturer’s instructions regarding overlapping and fastening procedures.
Mitering Corners for a Clean Finish
Mitering corners creates a sharp, professional look and prevents unsightly gaps. This involves cutting the ends of the siding panels at a 45-degree angle, ensuring a tight fit when joined. Accurate measuring is paramount; use a miter saw or a hand saw with a miter box for precision. Dry-fit the pieces before applying sealant and fasteners to ensure a perfect fit.
Once satisfied, apply a high-quality sealant to the joint before fastening the pieces securely to the underlying structure. Properly mitered corners provide both a visually appealing finish and increased weather resistance.
Installing Siding on Uneven Surfaces or Around Obstacles
Uneven surfaces and obstacles like pipes or vents require careful consideration. For minor irregularities, you can often compensate by adjusting the spacing of the fasteners or by using shims to create a level surface. For more significant irregularities, consider using flexible trim pieces or custom-cut panels to conform to the shape of the surface. Around obstacles, carefully measure and cut the siding panels to fit snugly, ensuring a watertight seal.
Use flexible sealant to accommodate movement and prevent leaks. Precise cuts and the strategic use of sealant are key to successfully navigating these challenges.
| Problem Area | Solution |
|---|---|
| Uneven Wall Surface | Use shims to create a level base for the siding panels. Consider flexible trim pieces for significant irregularities. |
| Obstructions (Pipes, Vents) | Carefully measure and cut the siding to fit around the obstruction. Use flexible sealant to ensure a watertight seal. |
| Inside Corners | Use inside corner trim pieces for a clean, finished look. Ensure proper sealing to prevent water penetration. |
| Outside Corners | Miter the siding panels at a 45-degree angle for a sharp, professional finish. Use a high-quality sealant at the joint. |
Finishing Touches and Maintenance
Properly finishing your insulated siding installation and establishing a regular maintenance schedule are crucial for ensuring its longevity and preserving its aesthetic appeal. These final steps will protect your investment and significantly impact the overall look and performance of your home’s exterior. Careful attention to detail during this phase will prevent future problems and ensure years of trouble-free enjoyment.
Installing Trim and Finishing Pieces
Installing trim and finishing pieces provides a professional, finished look and protects the edges of the siding from the elements. Different types of trim are available to accommodate various architectural styles and corner designs. These pieces should be selected to match the color and material of your siding for a cohesive appearance. The installation process typically involves measuring, cutting, and securing the trim pieces using appropriate fasteners, such as nails or screws, ensuring they are flush with the siding.
For example, J-channel is often used to cover the edges of the siding where it meets other building materials, while corner trim pieces neatly finish the corners of the house. Careful attention should be paid to ensuring a tight, weatherproof seal between the trim and the siding.
Caulking and Sealing Gaps
Caulking and sealing any gaps or cracks in the siding installation is vital to prevent air leaks, moisture intrusion, and pest infestations. This step significantly contributes to the energy efficiency of your home. Appropriate caulking materials, such as exterior-grade acrylic latex caulk, should be used. The caulk should be applied in a continuous bead, ensuring complete coverage of any gaps or joints between siding panels, trim pieces, and other building components.
For example, gaps around windows and doors require careful caulking to create a strong seal. Before caulking, ensure the surfaces are clean and dry for optimal adhesion. Allow the caulk to cure completely according to the manufacturer’s instructions before exposing it to rain or extreme temperatures.
Cleaning and Maintenance Recommendations
Regular cleaning and maintenance are essential for preserving the beauty and functionality of your insulated siding. A simple cleaning schedule will help extend the lifespan of your siding and prevent damage from dirt, mildew, and other environmental factors. For example, a yearly cleaning using a mild detergent and water solution, applied with a soft brush or sponge, will remove most dirt and debris.
Pressure washing should be avoided as it can damage the siding. For more stubborn stains or mildew, a solution of bleach and water (always follow the manufacturer’s dilution instructions) can be used, but caution should be exercised to prevent damage to the siding. Regular inspection for any signs of damage, such as cracks or loose panels, is also recommended.
Maintenance Schedule
| Task | Frequency | Details |
|---|---|---|
| Visual Inspection | Twice Yearly (Spring & Fall) | Check for loose panels, cracks, or damage. |
| Cleaning | Annually (Spring) | Wash with mild detergent and water; use bleach solution for mildew if necessary. |
| Caulk Inspection & Repair | Annually (Fall) | Inspect caulking around windows, doors, and trim for cracks and re-caulk as needed. |
Safety Precautions
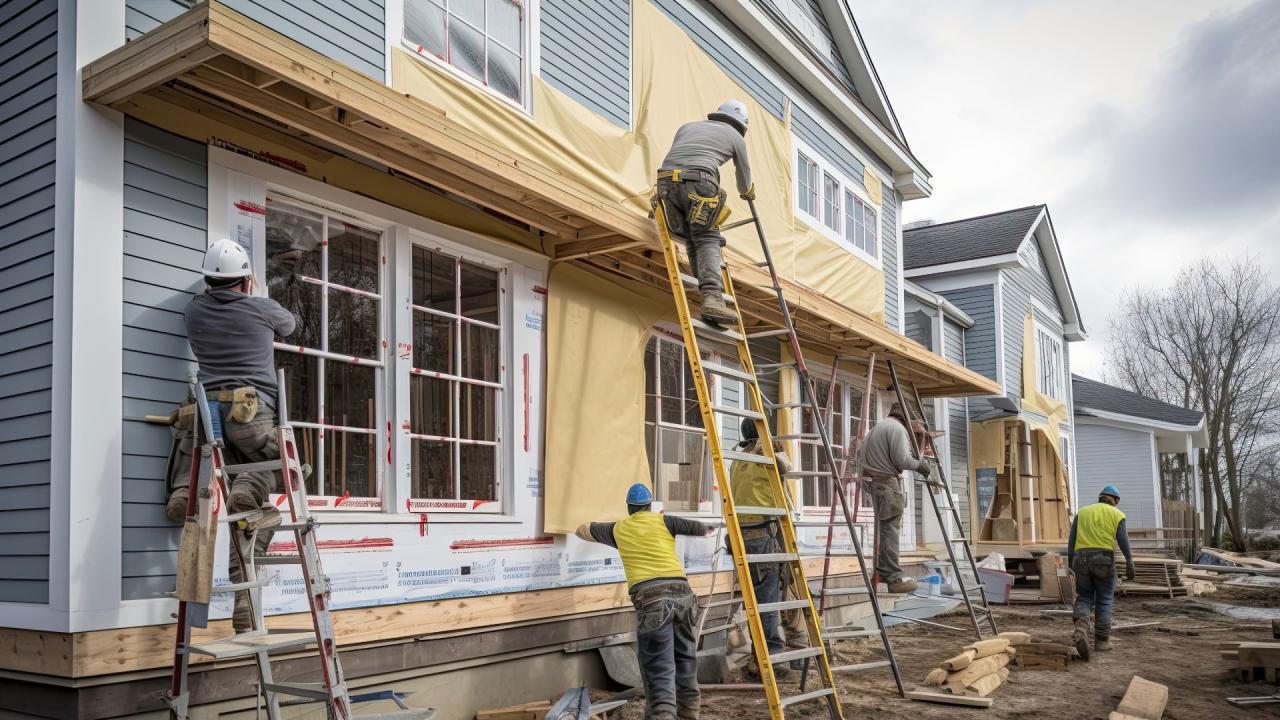
Installing insulated siding, while offering significant home improvement benefits, presents several potential hazards. Understanding and mitigating these risks is crucial for ensuring a safe and successful project. This section details essential safety measures to protect yourself and others during the installation process.Working with tools and materials at heights, or in close proximity to power lines, inherently carries significant risk.
Improper handling of power tools can lead to serious injury, and falls from ladders or scaffolding can have devastating consequences. Careful planning and adherence to safety guidelines are paramount.
Working at Heights
Working at heights requires extra vigilance. Always use a stable and properly secured ladder or scaffolding that is rated for the weight of both the worker and the materials being used. Ensure the ladder or scaffolding is placed on a level surface and extends at least three feet above the working platform. Never overreach while working at heights, and always maintain three points of contact with the ladder (two hands and one foot, or two feet and one hand).
If working from a roof, consider using a safety harness and lifeline secured to a stable anchor point. For large projects, scaffolding is preferable to ladders for improved stability and safety. Remember, a fall from even a short height can result in serious injury.
Power Tool Safety
Power tools, such as circular saws, nail guns, and drills, are essential for efficient siding installation. However, they also pose significant risks if not used correctly. Always use appropriate safety guards and wear the necessary PPE. Before using any power tool, carefully read the manufacturer’s instructions and ensure you understand how to operate it safely. Never force a tool; if it binds or jams, turn it off immediately and investigate the cause.
Regularly inspect power tools for damage or wear and tear and replace or repair them as needed. Keep the work area clean and free of clutter to prevent tripping hazards. Always disconnect power tools before making adjustments or cleaning them. Furthermore, be mindful of the cord placement to prevent accidental cuts or trips.
Personal Protective Equipment (PPE)
Proper personal protective equipment (PPE) is essential for minimizing the risk of injury during siding installation. This includes:
- Safety glasses or goggles: Protect your eyes from flying debris.
- Hearing protection: Reduce noise exposure from power tools.
- Work gloves: Protect your hands from cuts and abrasions.
- Dust mask or respirator: Prevent inhalation of dust and other airborne particles.
- Hard hat: Protect your head from falling objects, especially when working at heights.
- Safety harness and lifeline (when working at heights): Provide fall protection.
- Steel-toed boots: Protect your feet from falling objects and heavy materials.
Always ensure your PPE is in good condition and properly fitted before beginning work. Regularly inspect and replace worn or damaged equipment. The use of appropriate PPE is not optional; it’s a fundamental requirement for a safe work environment.
Illustrative Examples
Understanding the proper installation techniques for insulated siding is crucial for ensuring its longevity and effectiveness. Visual examples can greatly aid in comprehension. The following examples detail key aspects of a successful installation.
Properly Installed Insulated Siding Section
A properly installed section of insulated siding demonstrates precise panel alignment and consistent fastener placement. Imagine a wall section with several panels installed horizontally. Each panel should be butted tightly against the adjacent panel, creating a seamless, straight line across the entire wall. No gaps or overlaps should be visible. Fasteners, typically nails or screws, should be driven straight and flush with the surface of the siding, spaced evenly according to the manufacturer’s instructions.
Over-driving can damage the siding, while under-driving can compromise its weather resistance. The fasteners should be positioned to penetrate the underlying sheathing securely, providing robust support. Observing these details will result in a visually appealing and structurally sound installation.
Correctly Installed Corner Piece
A correctly installed corner piece showcases precise mitering and effective sealant application. Visualize an exterior corner formed by two walls. The corner piece, typically L-shaped, is carefully mitered at a 45-degree angle to create a clean, tight fit. The mitered edges of the corner piece are then firmly secured to the siding panels using appropriate fasteners. After fastening, a high-quality, paintable exterior sealant is applied along the mitered joints and the seams between the corner piece and the siding panels.
This sealant acts as a weather barrier, preventing water penetration and ensuring a durable, weathertight seal. The sealant should be applied neatly and evenly, ensuring complete coverage of the joints.
Flashing Installation Around a Window
Proper flashing installation around a window is critical for preventing water damage. Consider a window opening in an exterior wall. Before the siding is installed, flashing, typically made of aluminum or galvanized steel, is installed around the window frame. The bottom piece of flashing should extend over the window sill and be angled downwards to direct water away from the window.
Side pieces of flashing should overlap the window frame and extend beyond the window to ensure complete coverage. Top flashing should extend over the top of the window and be angled to divert water away from the window opening. The siding panels are then installed over the flashing, overlapping it to ensure a waterproof seal. Careful attention to overlapping and sealing is paramount to preventing water intrusion.
Any gaps or spaces should be carefully sealed with a high-quality sealant.
Summary
Installing insulated siding is a rewarding project that significantly enhances your home’s curb appeal and energy efficiency. By carefully following the steps Artikeld in this guide, paying close attention to detail, and prioritizing safety, you can achieve a professional-looking finish that will stand the test of time. Remember to always consult with a professional if you encounter any unforeseen challenges or are uncomfortable with any aspect of the installation process.
With proper planning and execution, your newly sided home will be a testament to your hard work and a source of pride for years to come.
Questions and Answers
What type of insulated siding is best for my climate?
The optimal type depends on your local climate. Consider factors like extreme temperatures, humidity, and potential for strong winds when making your selection. Consult with a building supply professional for recommendations specific to your region.
How long does insulated siding typically last?
With proper installation and maintenance, insulated siding can last for 20-30 years or even longer, depending on the material and environmental conditions.
Can I install insulated siding over existing siding?
In some cases, yes, but it depends on the condition of the existing siding and underlying structure. It’s crucial to assess the existing wall for any damage or moisture issues before proceeding. Professional consultation is recommended.
What are the common mistakes to avoid when installing insulated siding?
Common mistakes include improper fastening, inadequate sealing around windows and doors, and neglecting to account for expansion and contraction of the material. Careful planning and attention to detail are crucial.